Adding a Profile for Scanning
Adding and Managing Profiles
Steam Inventory Scanner can save Steam Profile data for future sessions, allowing you to initiate multiple Scans at once and scan multiple profiles with one click.
Profiles hold various Data that is both essential for the Scanner and your Convenience to utilize the Application fully.
They also remove the need to always copy/paste links or look up SteamID64 when you want to scan an Inventory.
Creating a new Profile
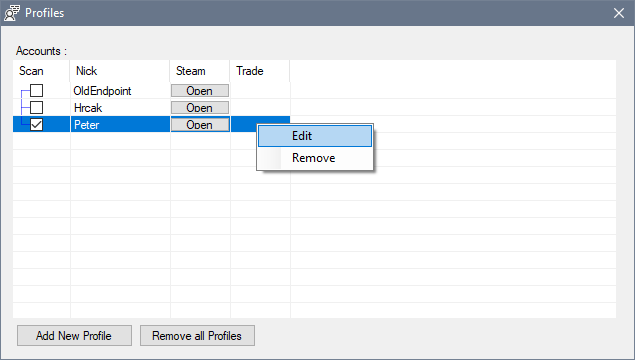
Profiles are managed by the Profiles Window . This Window lists all Profiles previously Added to the Application and Allows you to Modify them or add new Ones.
Adding a Profile
- Click Profiles within the Main Window, a new Window will Open
-
Click Add New Profile, a new Window opens up
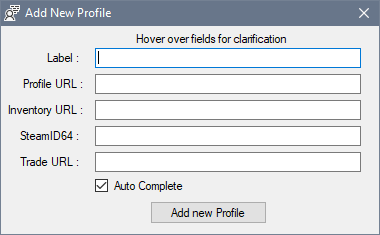
Here you need to provide the data correctly : -
Label - A Friendly Name for this Profile, used by the Steam Inventory Scanner Required
- Profile URL - A Direct URL to Steam Profile
- Opens a Profile Webpage once the Profile button is Clicked
- Example: https://steamcommunity.com/id/{USERNAME}
- Inventory URL - A Direct URL to Steam Inventory.
- Either this or SteamID64 must be provided.
- Uses old EndPoint, thus Slower Search Time
- If "Auto Complete" is checked, this field will be automatically filled once you copy the Profile URL
- Example: https://steamcommunity.com/id/{USERNAME}/inventory/
- SteamID64 - SteamID64 of the Profile.
- Either this or Inventory URL must be provided.
- Recommended as it allows usage of faster EndPoint during Scan.
- Example: 7656xxxxxxxxxxxxx
- TradeURL - Trade URL for this Profile, used by the App to Open Trade Page in your Browser when you click the Trade Button
How to get SteamID64
SteamID64 can be retrieved using various tools Online.
Steam Inventory Scanner doesn't have the ability to retrieve SteamID64 Automatically at this point.
Once you're done, click the "Add New Profile" Button.
The Window will close and your new Profile will be listed within the Profiles Window list.
Ensure that it's marked for Scanning.
Editing or Removing a Profile
To edit the Profile, open the Profiles Window from the main Window.
Editing a Profile
- Right-click an profile within the list
- Click Edit
- Change the desired Information
- Click Save Profile
Removing a Profile
- Right-click an profile within the list
- Click Remove
- Confirm