Caching and Loading the Data
Data Caching
Once you have the Inventory Data shown within the List, you can Save it to a File.
Saved Data can be Loaded at any point. You can also filter it or Search through it.
Saving Cached Data
To save the Data to a File :
- Have items in the List
- Click the "Save" button
- In a Dialog Box, provide a Name for the File, otherwise, a generic name with date and time will be set
Saved Data Format
Steam Inventory Scanner will use the Serialization format Set in Configuration Window.
Saved Data can be exported in XML or JSON Format.
Loading Cached Data
All Saved data will be stored in the Cache Folder of the Steam Inventory Scanner's main directory.
You can load it using the Cache Manager, or by manually opening the Files through the File menu.
To Load Cached Data using the Cache Manager :
- Click Cache button within the Main Window
- Cache Manager Window opens up and shows a list of all valid Cached Data located within the Cache folder
- Click the "Load" button next to the File that you wish to Load
- The Window will close and the list within the Main Window will be populated with the Cached Data.
To Load Cached Data manually :
- Click the File menu within the Main Window
- Click "Scan File"
- Select a valid Cache file created by Steam Inventory Scanner
- The list within the Main Window will be populated with Cached Data
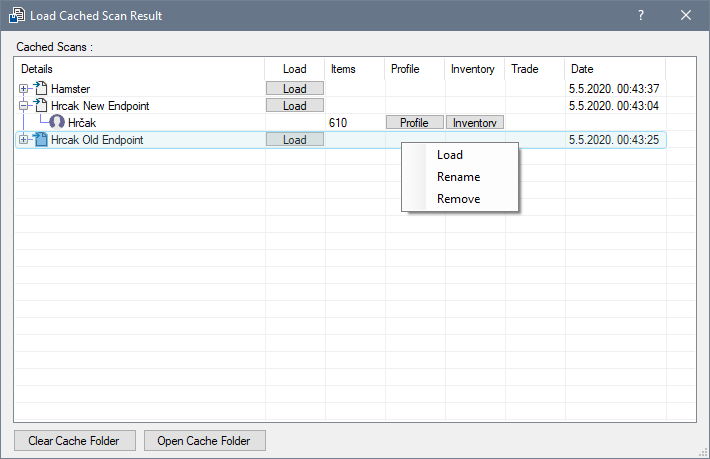
Cache Manager Window
This window shows a List of all valid files existing in the Cache folder.
It allows Loading, Renaming, or Removing Cached Files.
 s
s
Every entry contains Information related to the Scanned Data :
- Which Profiles are contained within the File
- The number of items in Each Profile
- Profile URL's (ex. Inventory, Profile, Trade links, etc.)
To Load, Rename or Remove and Entry :
- Right-click the desired Entry and pick the appropriate option
To Remove all items :
- Click on the "Clear Cache Folder" button located at the bottom of the Window
- Confirm Removal
You can also open the Cache Window in Explorer by clicking the "Open Cache Folder" button.
Clearing all Files is Permanent
Clearing Cache Folder will remove every file located within the Cache folder, not only the ones shown within the list.