Main Window
This section will explain the main Interface of Steam Inventory Scanner
Main Window
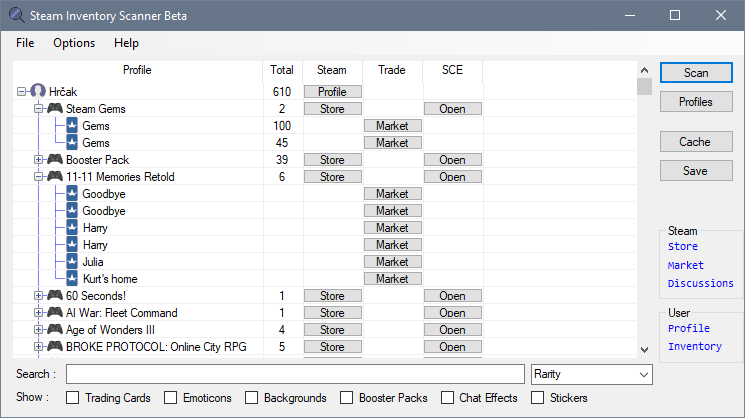
Item List
This list shows all of the Items that were Scanned or Loaded from Cache.
Items are grouped by User.
Clicking on the + sign next to a UserName, you can expand the entry, showing the Items that User owns.
List Buttons
List hosts a number of buttons for each entry :
- Profile - Opens Steam Profile of the Selected user in your Default Browser
- Market - Opens Community Market pointing to the Selected item, in your Default Browser
- STE "Open" - Opens Steam Trade Exchange page pointing to the selected item, in your Default Browser
- Trade - Opens Steam page pointing to the Trade with the Selected user
Buttons are only visible if the required URLs are provided.
Searching and Filtering
The lower part of the Application holds options for searching and filtering the content :
- Search Field - Allows you to search for Items within the list
- Show Checkboxes - This row allows you to filter items by their types
- Rarity Combobox - Allows you to filter items per their Rarity All filters can be combined
Application Buttons
Next to the list on the right side, you can see a series of buttons :
- Scan - Starts the Scanning process for each profile that is marked for Scanning
- Profiles - Shows a Window where you can manage existing profiles that will be Scanned
- Cache - Shows a Window with a List of all Cached data that you have Saved before
- Save - Saves the Current Scan Result to Cache
Hotlinks
Bellow the Application Buttons, there are series of Hotlinks :
- Steam -> Store - Opens Steam Store in Default Browser
- Steam -> Market - Opens Steam Market in Default Browser
- Steam -> Disccusions - Opens Steam DIscussions in Default Browser
- User -> Profile - Opens User Profile set in Config in Default Browser
- User -> Inventory - Opens User Inventory set in Config in Default Browser
Application Menu
- File -> Scan - Stars the Scanning process, as if you clicked on the "Scan" button
- File -> Scan URL(s) - Opens a new Window where you can pass Links to be Scanned
- File -> Scan File - Loads content of the selected Cache file
- File -> Cache - Opens the Cache Loader Window
- File -> Exit - Exits the Application
- Options -> Global Settings - Shows a new Window where you can configure the behavior of Steam Inventory Scanner
- Options -> Profiles - Shows a Window with Profiles, as if you clicked "Profiles" button
- Options -> Language - Shows a list where you can pick a Language for the Application
- Options -> Language -> Generate Language Sample - Generates a Language Sample that you can Localize to other Language
- Help -> Check for Updates - Checks for Application Updates
- Help -> Manual - Links to this Documentation in your Default Browser
- Help -> About - Shows information about the current version of the Application
Last update: May 4, 2020